|
|

How does it work ?
Here is a little quick start documentation for WebAlbumWizard (will be noted as WAW for more convenience in this documentation). You'll find here the steps needed to build your photo album in a couple of clicks ! A more complete documentation covering all aspects of WebAlbumWizard will be available soon.
WAW is designed to respect the directory tree you set up on your hard drive. It enables you to order your pictures directly as you used to do in windows, WAW will automatically creates the web pages according to your directory structure !
1/ The first step is to choose your source folder, where your pictures are. To do this, you can drag&drop the folder on the WAW main window, or you can also write the path directly in the "Root Web Directory" edit, or you can also click on "..." to call a dialog box asking you to select the folder, or finally, you can use the drop list to select a recent used folder.
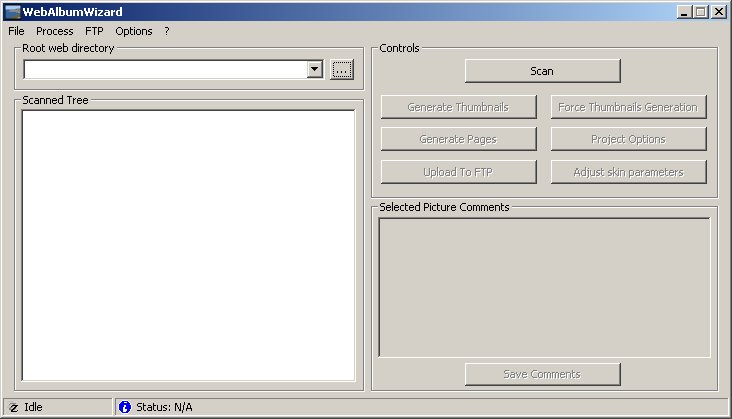
2/ The next step is folder choice validation, ask WAW to inspect the contents of this folder, and to load the settings if available. To do this, you just have to click on the Scan button !
3/ If it's the first time you create an album for this folder, the project options dialog will appear as soon as the folder analysis is complete. If you have already some settings saved, the dialog won't open, if you want to consult it, click on Project Options
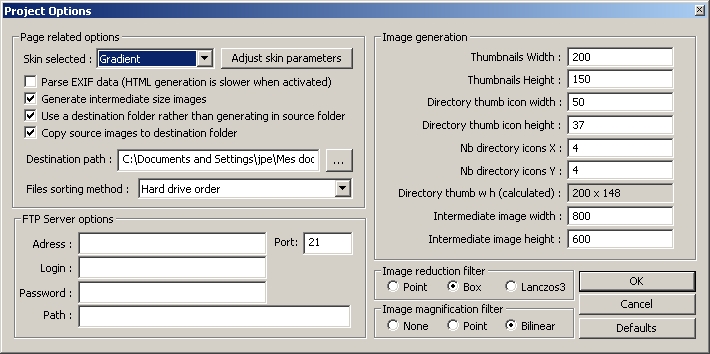
This window enables you to select the look of your photo album :
- Skin Selected: This option selects the skin of your album, don't hesitate to change it, webpages generation itself is the less time-consuming operation !
- Parse EXIF data: Check this box to indicate your skin that you want EXIF informations (like Shutter time, model of the camera, ...) to be included in the generated pages, if EXIF data is available of course.
- Generate intermediate size images: This option will make WAW generate intermediate size pictures (size can be selected). This will slow down the reduced images generation process a bit, but the skin you're using will be able to include pictures faster to load by your browser than original pictures.
- Use a destination folder: If this isn't checked, WAW will generates webpages and reduced images IN the SOURCE folder. Be careful to choose what fits your needs better.
- Copy source images: If you chose to build your album in a destination folder, you can check this box to make WAW copy the source pictures in the destination folder, therefore, be accessible by your album.
- Destination path: Indicate here the wanted destination folder. You can type it, or use the "..."
- File sorting order: This option changes between the different methods of sorting pictures in your album.
- FTP Server options: Not implemented right now.
- Thumbnails Width/Height: Theses two numbers controls the size of your thumbnails, used in the indexes of your albums.
- Directory thum icon Width/Height: WAW also generates a small picture for your folders, composed with containing pictures. Theses parameters controls the width and height of a single image in the folder picture.
- Nb directory icons X/Y: You can specify here how many reduced images there will be in your folder picture.
- Directory thumb w h: This box specifies the size of folder pictures. It's only an information, since it's calculated by WAW.
- Intermediate image width/height: Specify here the desired size of your intermediate pictures (most usual values are 640x480 or 800x600 for instance).
- Image reduction filter: You can choose the quality of the reduction filter algorythm. Point is the fastest, but not good results, Lanczos3 is the slowest, with better quality.
- Image magnification filter This parameter is the same as Image reduction filter, but for magnification ;) None won't resize the picture, point is the fastest, and Bilinear have the best quality.
Once you found the settings that fits your needs, you can continue by clicking on Ok.
4/ You are now ready to launch the generation of your album ! This process is splitted in two steps, the first is the pictures generation. This step can take some time depending on the picture count, picture resolution, and you CPU's horsepower. To launch the process, just click on Generate Thumbnails. Please note that only non-existing pictures will be generated.
Once the pictures are generated, you can go to next step, webpage generation, by clicking on Generate Pages.
5/ Your album is now ready, you can check it !
The process of picture generation and web pages generation is splitted in order to enable you to simply click on Generate Pages if you just want to change the skin. Since the webpage generation step is quite fast, you can easily test all the skins you want !
|